Spatial Intelligence

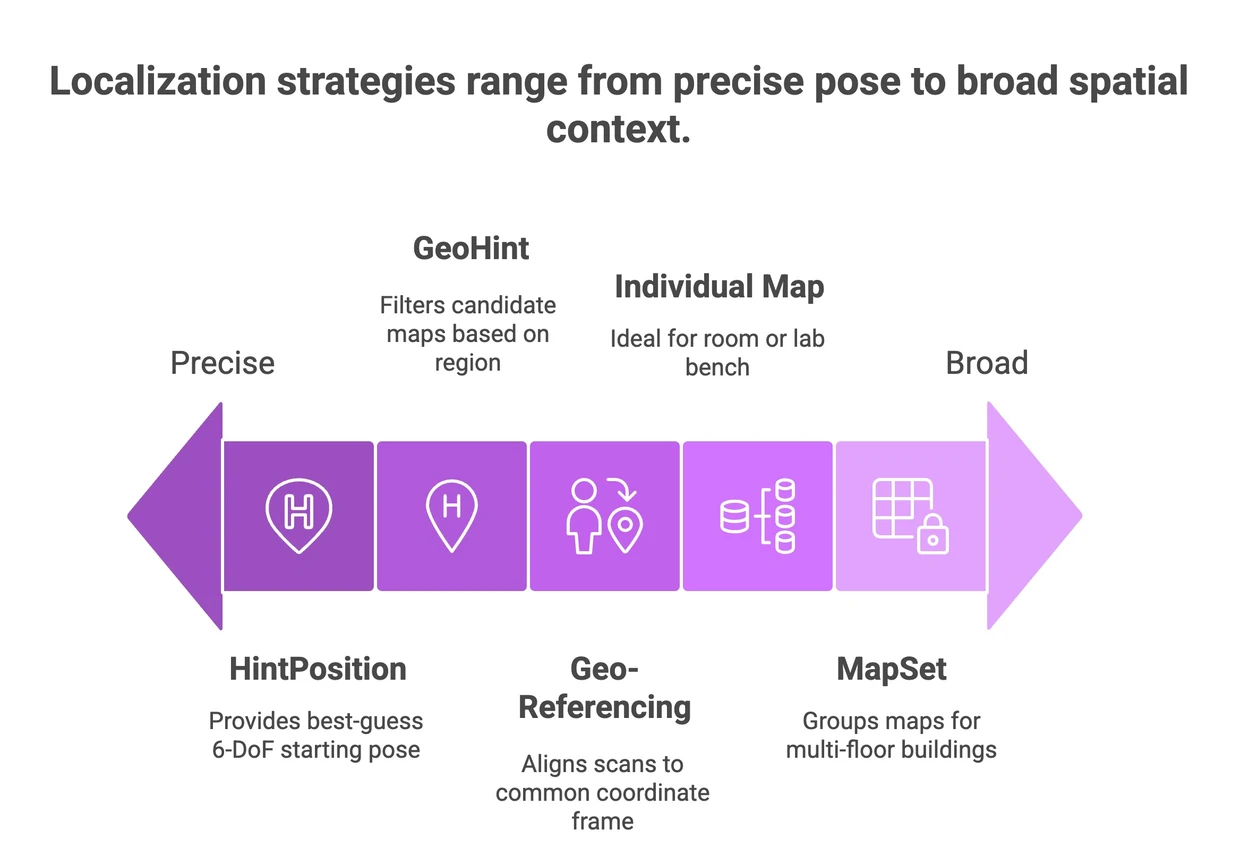
Anchors are the “atomic unit” of believable AR: a pose (position + orientation) the system keeps aligned to the real world as it updates its understanding over time. In WebXR parlance, that’s literally the XRAnchor concept: a maintained pose that survives tracking updates so your 3D content doesn’t slide off reality.
Most AR stacks do great with planes (floors, tables) and hit tests. But what if you need your overlay pinned to a specific wrench head, a calibration port, or a museum artifact label reliably, without stickers or special markers? That’s markerless, model-based object tracking: recognize this physical object by its shape + texture, then provide a stable 6-DoF anchor on it.
There’s also a strategic reason. With Azure Spatial Anchors retired in November 2024, teams are looking for cross-platform, standards-aware alternatives that work across mobile, headsets, and importantly the browser. The market is consolidating on a few sensible primitives (poses, anchors, maps), so our goal with ModelSet was to make object-level anchoring dead simple and highly portable.
ModelSet lets you upload a textured 3D model (GLB/GLTF, or CAD converted to GLB) of a real-world object and get back a ModelSet code you can drop into any MultiSet SDK. Your app recognizes the object and locks digital content to it - markerless and with centimeter-level stability - then you deploy that same experience to Unity, WebXR, iOS, Android, Vision Pro, Meta Quest and more. You can run it in our cloud, your private cloud, on device or fully on-premises.
If you’ve used “model target” systems, you’ve likely spent hours wrangling datasets, guide views, and training queues. The Vuforia Engine, for example, supports “Advanced Model Targets” that are produced via cloud-based deep learning training and organized into databases with recognition ranges and user volumes. It’s powerful—but it’s also operationally heavy when all you want is to upload a model and ship across runtimes.
We architected ModelSet for speed-to-first-anchor and portability:
Are we the only ones who think “upload model → detect object” should feel this straightforward? Not at all, the broader industry is converging on the pattern. You’ll see marketing on some sites emphasizing “upload a 3D model, detect in real time - no custom training required.”
Step 1 — Author a Production-Ready Model
This is 80% of the game. Every stability complaint I’ve ever debugged started with the asset:
Symmetry note: If the object is rotationally or bilaterally symmetrical, the tracker has fewer unique features to disambiguate pose. Tweak the texture (subtle label, serial plate, orientation marks) so there’s always some “tell” at the expected viewing distance.
CAD teams: Convert to GLB/GLTF, unwrap UVs, keep even texel density on the faces that will be seen in your workflow.
Step 2 — Choose a Tracking Type
Step 3 — Upload, Process, Publish
Create a ModelSet in the MultiSet dashboard → drag-drop .glb/.gltf → pick 360° or Side View → kick off processing. Most jobs complete in under 10 minutes, after which you’ll see the status flip to Active/Ready and receive a ModelSet code for your app. (This is a great time to make a coffee, not lunch.)
Step 4 — Integrate in Your Runtime
Unity: Import our SDK, open ModelSet Tracking in Sample Scenes, paste your ModelSet code, place your AR overlays as children of the object anchor. Pro tip: the reference mesh is for authoring; remove it from the final build—localization doesn’t need it.
WebXR (browser): In WebXR, you capture camera intrinsics and a frame, call localization, then maintain alignment using XRAnchor so the pose stays glued as the session updates.
iOS / Android (native): Use our native guides to integrate with ARKit/ARCore, authenticated via project credentials.
Step 5 — Author Overlays That Feel “Native to Reality”
Step 6 — Validate in the Field
Take your actual device to the actual environment: the lighting, standoff distances, reflections, and operator movement patterns you expect. Spend ten minutes circling the object, vary angles, and time a 2–3 minute operation. If you see jitter, look first at texture detail (is it readable at distance?) and glare.
Step 7 — Choose Hosting and Privacy
There are a few ways to solve “object anchors” today:
If your requirement is “explain assembly step #3 on this exact SKU” or “show me this artifact’s story,” model-based wins.
When our customers ask “how accurate is it?”, they rarely want a lab number—they want to know whether a 5 cm misalignment will cause a wrong button press or a safety hazard.
In recommended conditions (true scale, +Y, textured mesh, balanced light, typical distances), ModelSet delivers sub-5 cm anchoring on mainstream mobile devices and modern headsets. If you need to harden this for a ruggedized site, two practical things move the needle most:
On the browser, remember WebXR anchors are your friend, use them to maintain alignment with the runtime’s evolving world understanding. MDN’s XRAnchor coverage and the Immersive Web anchors explainer are nice conceptual references here.
“It recognizes, but orientation flips.” Symmetry is the usual suspect. Add a unique mark on one side, or increase texture contrast where the camera actually looks.
“Stable up close, noisy at 2 meters.” Your texture lacks feature scale at distance. Increase macro features (decals, panel edges) and retest at 1–2 m.
“Great in the lab, drifts on site.” Lighting and specular reflections. Reduce glare, consider a matte sticker in the texture, and re-export.
“Processing takes too long.” Do you actually need top/bottom visibility? Side View trims unnecessary views and often processes faster, especially for fixed installs.
I keep this part boring on purpose because it’s easy to hand-wave. Your WebXR flow is:
The mental model aligns with MDN’s XRAnchor docs and the Immersive Web Anchors module: an anchor is simply a pose the system keeps tracking so your content doesn’t slip as the runtime’s world model updates. If you want to see ours in action, the WebXR Integration doc and GitHub sample make this very literal.
Unity remains the fastest way to get an on-device, production-ish test. Our ModelSet Tracking sample is designed so you can:
One easy-to-miss line in our docs: the reference mesh is for authoring and alignment - you don’t need to ship it in your final build. This keeps builds lean and avoids shipping IP unnecessarily.
Goal: The overlay walks a trainee through setting 27 bolts, shows “+” and “–” nudges on the dial, and highlights the objects to be 'wrenched' during calibration.
Outcome: Consistent, sub-5 cm alignment across mobile and browser, no stickers, no guide screens, no fuss.
If you’re migrating off vendor-specific cloud anchor stacks: ASA is gone (Nov 20, 2024 retirement) and some associated samples are deprecated. A pragmatic migration is to adopt ModelSet for object-specific anchoring and MultiSet VPS for broader scene/venue localization, then standardize your browser layer on WebXR Anchors semantics. This keeps your “write once” mental model and opens up on-prem/self-hosted options that don’t exist in many legacy stacks.
If you’re evaluating “upload model → detect object” style solutions generally: you’ll see similar front-door messaging elsewhere (upload GLB/FBX/OBJ, detect in real time, no custom training). Those claims rhyme with what devs want. Where we obsess is enterprise-grade privacy, on-prem viability, and a unified approach across Unity/WebXR/native so your team’s mental model doesn’t fragment.
ModelSet & Object Tracking Use Cases:
ModelSet & Object Tracking Metrics:
- ModelSet: Object Anchoring → overview and concepts.
- How to Create a ModelSet → prep checklist, 360° vs Side View, processing.
- Unity SDK: Sample Scenes → ModelSet Tracking.
- WebXR Integration → intrinsics + frame, sample repo.
- Credentials / On-Prem / Analytics for enterprise rollouts.
- Markerless Object Tracking SDK
- ModelSet: Object Tracking Tutorial — GLB Import, 360/Side View → AR Overlays → Publish
- Convert an existing CAD to GLB, add believable texture, and try Side View first if your use case is fixed-view.
- Ship a Unity prototype in a day; then replicate in WebXR for browser parity.
I don’t romanticize CV problems anymore. Most “AR drift” tickets are asset prep issues in disguise, and most “SDK limitations” are just mismatched expectations. ModelSet won’t make bad textures good, but with a sane asset and the right tracking mode, you’ll get sub-5 cm, repeatable anchors that survive demos and production.
My biggest advice? Texture for the distance you ship, not the distance you render. And never go to site without validating under the actual lights your users work in. When you’re ready, spin up your first ModelSet, embed our sample in your project, and ship something your operators don’t have to baby. I’ll be the one at the back of the demo, watching your labels stay pinned while you walk around the machine with a grin.